Last updated on: March 17th, 2026

Cinematic Lighting Techniques for Video

Many video creators early in their journey fall into a frustrating trap: they invest in high-end gear, set up powerful lights, and aim them at the scene, yet the result looks flat, lifeless, or simply “amateurish.” The problem is not the equipment, but a fundamental conceptual confusion between illumination and lighting design.

As expert Chuck Gloman puts it: “A scene may be illuminated, yet far from lit.” Illumination is the technical act of making objects visible; lighting design, by contrast, is the craft of creating depth, expressing emotion, and telling a story. To move from basic illumination to cinematic creation, we must adopt several professional insights that combine the physics of light with the art of visual storytelling. So her e are some Cinematic Lighting Techniques you must know.

Follow a Disciplined Production Process

Professional lighting follows a specific five-step sequence:
  • Block,
  • Light,
  • Rehearse,
  • Tweak,
  • and Shoot

You must insist on a blocking rehearsal before setting lights to understand the actors’ movements and the camera’s frame. U would also advise you to start thinking about lighting on the shooting script process, at least in general.

Light is only the excuse - the real goal is shadow

The most important insight in lighting design is that the main role of a light fixture is not merely to spread light, but to place shadows. Shadow is your most powerful tool within the two-dimensional frame; without it, there is no way to convey depth, texture, or dimension.

  • Creating depth and texture – Shadows are what define the three-dimensional structure of an actor’s face and the space within a room. Side light that creates small shadows reveals the texture of fabrics, walls, and skin.
  • Concealment – What you choose not to show is sometimes more important than what is visible. Shadow allows you to direct the viewer’s eye to what matters most and avoid distractions.
  • Optical precision with the Leko – To control shadows with surgical precision, professionals use the Leko (Ellipsoidal) light. Thanks to its lens system and internal shutters, it can cast sharp shadows, shape precise geometric forms, or use gobos (metal templates) to project patterns such as a window shadow or tree branches onto the background.

Remember: if you do not have a clear purpose for every shadow in the frame, your lighting is not yet designed – it is merely illuminated.

Master the Three-Point Lighting Setup

The Three-Point Lighting setup is the “North Star” for every beginner. By balancing three distinct light sources, you create a professional look that separates the subject from the background and adds dimension.

Pro Tip: Don’t feel obligated to make all three lights equal. Often, a subtle Back Light is all you need to create that “cinematic pop.

Overhead diagram showing the optimal placement of key, fill, and back light fixtures for a classic three-point setup
  •  The key light is the primary source that establishes the direction and mood of the light. Placing the key on the far side of the actor (the side of the face farthest from the camera) often creates more pleasing modeling and depth.
  • The fill light is a soft source used to reduce the darkness of shadows created by the key without casting its own shadows.
  • The backlight (or rim light) is essential for separation, creating a highlight along the subject’s edges to pull them out from the background.

The Ritual Before the Storm – Start from Darkness

The biggest mistake amateurs make is adding light to a scene that already has existing light in it, such as normal room lighting. The professional way to build a scene is to start from complete darkness. Turning off all the lights allows you to see your canvas clearly and add one light at a time, while understanding the precise role of each light source.

“Creative Calibration”: The Physics-Based Manipulation Behind Perfect Color

An advanced technique for controlling the look of an image is false white balance. While most creators perform white balance (WB) on a clean white card to achieve “accurate” colors, an understanding of the physics allows us to manipulate the color space in order to create emotion.

The technical mechanics: When you calibrate the camera using a card tinted cyan or blue, the camera’s circuits detect an excess of blue and green and compensate by reducing the voltage in those channels. The result is a warmer, richer, more golden image—sometimes described as a “buttery” look. Understanding this manipulation allows you to control the viewer’s emotional response without expensive ND filters.

Professional cautions:

Test in advance: Do not try this for the first time on an important shoot day. A card that is too saturated may cause skin tones to appear unnaturally red.

Safety first: When working with quartz-halogen lights, never touch the bulb with bare hands. Oils from the skin react with the quartz envelope at high temperatures, which can lead to bubbling and the bulb exploding. Always use gloves or the protective paper wrapper.

Control Contrast and Exposure

Video cameras have a limited contrast range (typically 30:1), meaning you must compress the scene’s brightness to fit the system’s capabilities.

 Use a waveform monitor to set precise light levels and a zebra display to identify and eliminate “hot spots” that exceed 100 IRE.

To manage high-contrast situations, add light to deep shadows or use neutral-density (ND) filters and gels to reduce the intensity of bright areas like windows.

The Inverse Square Law – Why Distance Is Your Best Friend

One of the classic lighting problems is extreme light falloff: the actor’s head looks blown out (overexposed) while their legs remain too dark. This is where physics comes in: the inverse square law, represented by the formula:

F = 1 / d²

Distance from Subject Light Intensity (%) Exposure Loss (Stops) Visual Result
4 Feet 100% 0 Stops Base Exposure
8 Feet 25% -2 Stops Significant Falloff
12 Feet 11% -3.1 Stops Deep Shadow
16 Feet 6.25% -4 Stops Extreme Falloff

This law states that light intensity falls off in inverse proportion to the square of the distance. Let’s look at the numbers:

If the light is positioned 4 feet from the actor’s head (a value of 16) and the distance to their feet is 8 feet (a value of 64), then only 25% of the light reaches the feet (16/64). That is a dramatic difference of about 2 stops.

A visual explanation of the inverse square law showing how light intensity decreases from 100% to 25% when the distance doubles

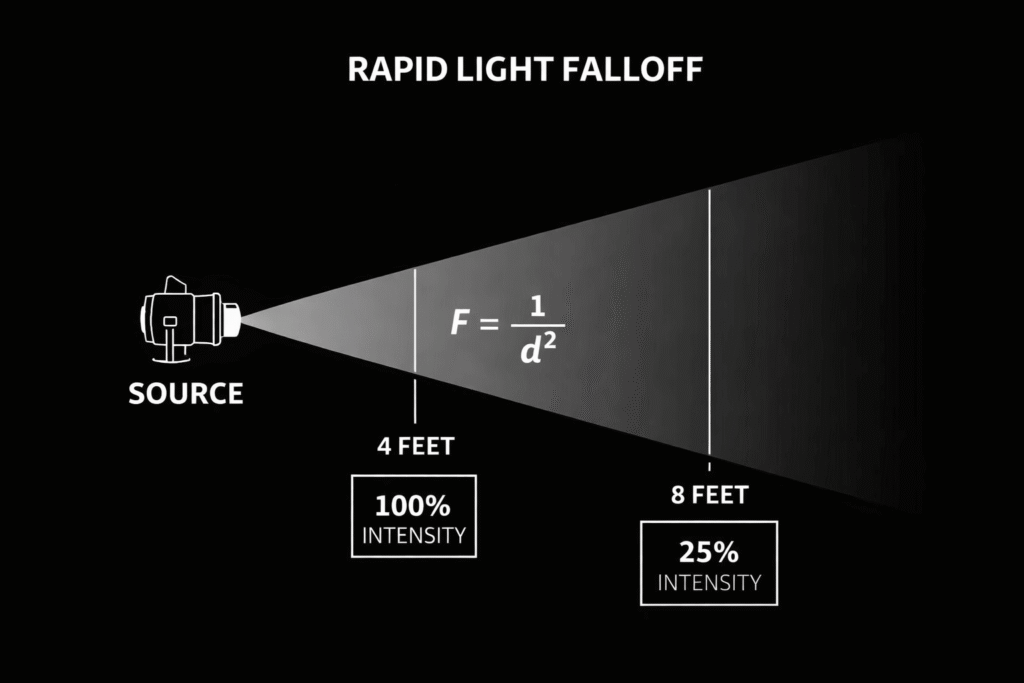
By contrast, if we move the light back to 12 feet from the head (a value of 144) and 16 feet from the feet (a value of 256), the ratio improves to 66% (144/256).

The professional paradox: to achieve more even lighting, we often need to move the light source farther away and make it more powerful.

Three practical solutions to light falloff:

  • Move the light farther away: Increase the distance from the subject and use a stronger fixture, such as a powerful Fresnel.
  • Use a graduated scrim: A graduated metal screen placed in front of the light that reduces only the upper part of the beam hitting the actor’s head.
  • Use blocking tools (scrims/nets): Place external nets or scrims on separate stands to “shave off” excess light from the areas closest to the fixture.

Manage Color Temperature

Standardize your color balance to ensure realistic skin tones, typically using 3200K for indoor (tungsten) lighting and 5600K for outdoor (daylight). When working with mixed light sources, use color correction gels (like CTO to warm blue light or CTB to cool orange light) to bring all fixtures to the same color temperature.
Perform a white balance whenever the camera or lighting conditions change to maintain consistency across shots.