
Movie School Free » Film Editing Course » Digital video editing’s stages
The 7 Stages of Video Editing

In this lesson, I’m going to go through the 5 stages of editing, but basically, we can break down the video editing process into two stages:
- Assembling the shots into a rough cut and
- fine-tuning the rough cut to transform it into a fine-cut.
The video editing process is built from several stages. Many people considered this part a simple one (plug shots together like Lego), but this is a mistake that hurts many beginner’s filmmakers. Digital video editing is one of the most critical steps in film production. It is writing the final script of the film. So what are the stages of editing? here are all the stages you need to go through when getting into the editing room.
Choosing The Right Video Editing Software
Selecting the right video editing software is a crucial step in your journey as a digital editor. Whether you’re creating short social media videos or producing long-form content, your software will be the core tool that shapes your final product.
Free vs. Paid Software
For beginners, free video editing software like DaVinci Resolve, HitFilm Express, or even iMovie can be a great starting point. These tools offer a surprising range of features and are often more than enough for basic editing, learning the workflow, and understanding timeline-based editing.
However, if you’re aiming for more advanced features like 3D compositing, multi-camera editing, or seamless color grading, then investing in paid software such as Adobe Premiere Pro, Final Cut Pro, or Avid Media Composer (my personal favorite) might be the way to go.
The right choice depends on both your budget and your long-term goals.
What to Check Before Choosing?
Before you commit to a video editing platform, ask yourself:
Does it support your video formats?
Some free software may struggle with 4K, RAW, or newer codecs.Is it compatible with your OS and hardware?
Always check the system requirements. Some high-end programs need powerful GPUs and lots of RAM.Does it offer the effects, transitions, and features you need?
Make a list of must-haves like motion tracking, audio mixing, or color grading, and compare it against each software’s capabilities.Is the learning curve worth it?
Tools like Avid are industry-standard in film and television, but can be complex for beginners. Others, like Filmora or Premiere Elements, offer a smoother entry point.
Consider Your Computer Setup
Video editing is a resource-heavy task. Your computer should ideally have:
At least 16GB of RAM
A dedicated graphics card
A modern multi-core processor (i5/i7 or AMD equivalent)
If you’re using an older machine, opt for lightweight editors or cloud-based tools like Clipchamp until you’re ready to upgrade.
How Professional Do You Want to Get?
If your goal is to make YouTube videos or personal projects, free or mid-tier paid software may suffice. But if you’re planning to work in the film industry, broadcast media, or large-scale commercial projects, you’ll eventually need to get comfortable with professional tools, and that’s where Avid Media Composer shines.
It’s powerful, precise, and trusted by professionals worldwide, which is why it’s my go-to choice.
Although the video editor enters the post-production stage, I recommend that the video editor also be at least in one meeting of the pre-production stage. That way, he can prevent choices that might cause trouble when coming to the editing room, and explain what he needs to create the atmosphere the film director needs.
The Log-line
The first question the video editor needs to ask the director is what the movie is about. Not just the plot of the movie, but what it is really about. Whose character’s point of view are we seeing? How does the main character change through the film, and what causes it to change each time. Once the director explains all that, you need to create a log-line, which is the full story in up to 3 lines. You will need to return to this log-line throughout all of the editing’s process- Every time you are not sure about something in the film, you should go and reread the log-line. For example, The Matrix log-line will be A story about a computer hacker that learns from mysterious rebels about reality and his job in the war against those who control his reality.
Importing and Logging the material
All of the digital video editing processes start with logging your footage. Logging means sorting your material into bins and cutting out all the unusable footages. Logging is an excellent opportunity to watch your material. While you are viewing the material, you should also notice if there are problems with the film’s footage and if re-shoot are needed.
In the past, many productions have a thing called “rushes Dailies,” a meeting of all the lead production members to watch the raw material of what they shot that day. Video editors used to participate in that, so they won’t have to view all of it together. If you are attending this type of daily meeting, it’s essential to take notes, and at the logging, the stage is an excellent place to pay attention to these notes.
In today’s world, because of the massive amount of material that is being shot every day, you don’t see a lot of this daily, and the video editor needs to watch it all at once. Whether there are dailies or not, don’t start editing without waiting all the material before you cut. Especially before each scene, you start editing.
The video editor has to deal with a large amount of raw material. Usually, he will make one minute of film from every few hours of material, so it’s essential to work in an orderly and organized manner. The logging stage is the stage to organize your material. The organization of the material is necessary and will help you to analyze your material and to work more effectively. You can read more about it at my post on Organizing Video & Footage in Your Video Editing Software.
Organizing Video & Footage in Your Video Editing Software
Finding a system to organized your video editing files should be the first thing you do after opening your Video editor software. It doesn’t matter what video editing software you are using – movie maker, Avid, or Premiere.
Now, every video editor will find his/her way to organize the footage and I want to teach you mine. Finding the strategy to organize your clips will make your work a lot better and faster. If you are working on very small projects right now, you might not see the need for organized files, but you should build the habit of organized work, so you won’t be in shock when big projects come along. Here are the steps I take, when organizing my files:
- Naming the Clips – Name the clips after the scene’s number, the shot’s number, and the take’s number, so it can be something like 05-06-03, which means scene 5 – shot 6 – take 3. Keep the names short. Now, most of the editing software will let you see what’s in the clip, just by clicking on it. You need to set the clips to show you the thumbnail of each clip
If you already know the footage, most video editing software (like Avid) will give you the option to color each type of clip in a different color like green for good takes and red color for bad takes.
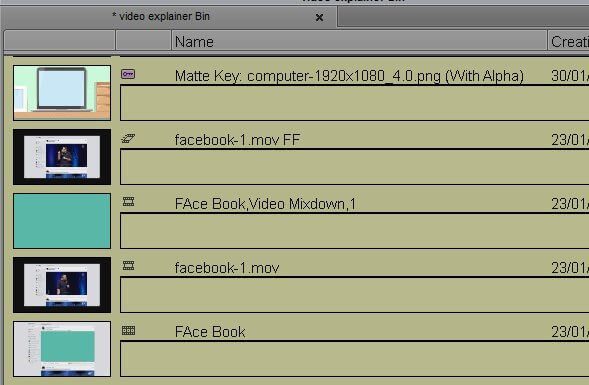
2. Organizing video in bins and folders – Now you need to decide how you want to organize the materials into the bins. I like to organize the bins first by the days of shooting. For example, If I have three tapes on shooting day 1, they will be placed in the “Day 1” bin. All the tapes of the next shooting day will be placed on the “Day 2” bin, etc. After I finish organizing the clips by shooting days,, I’ll usually make another folder called “Editor” or “Work”. Then I’ll copy all of the clips to new bins, which will be organized by scenes. Later on, you’ll also have to make a bin for graphics, audio, and everything else that is not your video files. If you want, you can also make a bin for bloopers or behind the scenes shots.
Here is another tip – Give numbers to your folders, for example, 01_Media, 02_Audio,03_GFX, etc. That way, the video editing software will organize the folders in the order you want them to be. I recommended you to have a bin called Master or Current Edit and to put in it the last version of the edited sequence.
No matter what strategy you choose, you must be consistent with it. If something doesn’t work for you, you can change it, but make sure you are changing all the material. I would love to hear how you are managing your video & footage in your video editing software, so you can answer me in the comment section.
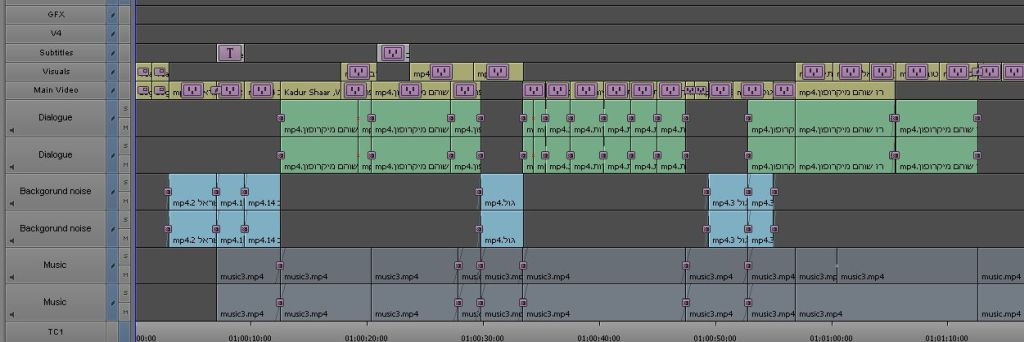
3. The timeline – The timeline also should be organized in a way that you can find clips very quickly. The best way to do it is to make sure each layer will be for a different type of video or audio. For example, you can have one video layer for someone talking, another layer just for the visuals to cover him, another layer just for the subtitles, and another one. That may sound like a lot of layers, but trust me, it will help work faster and more efficient. In the image below, you can see I’ve even colored each type of layer in a different color and I even gave a name to each type of layer.
Now we can move on to the editing
First Assembly(Assembly Cut)
First Assembly is also known as assembly cut, or as Editor’s Cut, because usually, the director is not present at this stage. It’s basically the first cut of the movie. In this stage, the video editor is connecting the best film’s footage into one very long movie without any real editing. The video editor can work with a shooting script or a storyboard as a guideline, and usually, the video editor will get a script with instructions about how each raw in the scene was cut. The video editor also needs to go through his notes and there log-line, before starting this stage.
At the assembly cut stage, it is also possible to insert clips that you are unsure about them. The aim is mainly to arrange the raw materials in the film’s chronicle order while reducing them as much as possible. When you finish the assembly, you might find that every scene’s pace is very different from each other. At this point, it’s OK. Here are some tips for the assembly cut stage:
- In most cases, you will want to start from the beginning of the film, but sometimes it might work best to start from the middle and connect all the scenes.
- If you haven’t watched all the material in the logging stage, this is the time to do it. The assembly cut is where you are going to “throw out” a lot of the footage and don’t want to miss anything.
- If you are editing a documentary film, you might want to try a Blind Assembly, which means to edit without the video channels.
The most important thing to remember in this stage is not to over-edit. At this stage, you only want to see the film in its purest form.
Rough Cut
The rough cut stage is also known as Director’s Cut, and there could be several Director’s Cut. It is when the video editor starts thinking about the story. The director and the editor are required to make significant artistic decisions for the film and build the director’s vision. Again the video editor needs to read the log-line, and before each scene that about to be edited, he needs to ask:
- Whose scene is this?
- What is the main event of the scene?
It is also the time to pay more attention to the structure and the pacing of the movie. The rough cut is shown to the producer and everyone that can contribute to the shaping of the overall editing. The cuts are still not perfect, but the general idea of how the film is going to look like is presented. Usually, the director is going to be more involved in this stage. After the rough cut is ready it is time to go through all the scenes again, and to take a hard look as to what is working and what is not. At some point the producer will join, and with the video editor, they will create the Producer’s Cut
Fine Cut
At this point, the film much shorter and closer to the final length. The director and the video editor have been tightening all the cuts, the dialogs, the pace of the film, and basically every frame. The next stage is going to be to send it to color correction, sound design, etc.,
After the director, producer, and video editor agree on the final product, the video editor releases the movie to the other professional members of the post-production to take care of music, sound effects, motion graphics, etc. I’m going to focus now on the two main final cut elements: Sound Design and Color Correction.
The Final Cut
After the director, producer, and video editor agree on the final product, the video editor releases the movie to the other professional members of the post-production to take care of music, sound effects, motion graphics, etc. I’m going to focus now on the two main final cut elements: Sound Design and Color Correction. In this online film editing course, we are talking a little bit about color correction, and we also have a small course about sound design, and if you want to work as a video editor, I recommend reading them too, since a lot of times (mainly in low budget films), you will be in charge on them also