Online Film School Free » Film Directing Course » Film Cinematography for Directors » Basic camera technique & movements in film
Basic Camera Techniques, Movements and Terminology
Table of Contents
Toggle
The camera angles in a film are one of the essential rules you need to know about filmmaking. Whatever field you’ll take on the film and television industry, whether it’s producing, directing, acting, scriptwriting, etc. Every filmmaker needs to learn the technical terms of any shot. I’ve also added here some basic terms you should know as I feel it will help you to communicate your vision better. Why knowing camera techniques is important?
I know that learning the video terms can be a little dull sometimes, but it’s very important to understand the tools you are using as a cinematographer, director and video editor. Not knowing them will not only hurt your film but also will make you look bad in front of other peers in the industry. You can be very creative, but if you don’t know the basic digital video terminology, you might look unprofessional.
Important film terminology you must know
You don’t need to be afraid from the technical terms, they’re pretty easy to understand, but there are too many of them. In this cinematography lesson, I’m not going to go through all of the video glossaries, but I am going to explain the terms in great detail. If you’ll want to find out more about this stuff I recommend reading The Filmmaker’s Handbook: A Comprehensive Guide for the Digital Age. This book is kind of known as the bible of filmmaking. It talks about more than just technical terms, but it focuses on the technical parts just enough to set you on your way. Even if you are just interested in the film direction course of this blog, it is still recommended to go through this lesson first.
So let’s get started:
Framing
The primary thing to remember when working on framing is the “rule of thirds.” At the point when you glance through your viewfinder to outline a scene, attempt to imagine the frame is divided into three parts – horizontally and vertically and adjust the objects to fit it nicely. Other basic framing concepts are the headroom and nose room. Headroom means to leave some free space at the top of the frame, and the nose room means to leave some free space at the side that the character is looking at.
The Right Amount of Headroom

Too Much Headroom

Aspect ratio
A term that started to be more important for cameramen these days. Aspect ratio indicates the size of the picture by stating the relationship of the width and the height size. It will be presented with two number separated with a colon. The first one will indicate the width of the frame and the second number will indicate the height of the frame.
In the aspect ratio 16:9 the 16 is relating to the width and the 9 is to the height,
but it is important to remember that the number is not declaring the size of the frame only the relationship of the with the height, so the aspect ratio 16:9 can be also represented as 8:4.5.
The Aspect ratio term used to be a simple term since they were only two – 4:3 and 1.85:1. The four to three ratio and the 1.33:1 are known as standard definition (SD) and the 4:3 is known mainly the way most of the old TV shows were shot. The 1.85:1 has the widescreen look and could only be achieved by a film.
The digital age brought different kinds of new aspect ratios, but the most important one is the 16:9 ratio wich belongs to all high definition formats (HD) and this is the ratio all TV and filmmakers are using more often this days, since it’s the only way to get the widescreen film look. And of course, the is the 4K ratio, wich is 1.9:1
The aspect ratio is very important for video editors as they define the project in these settings
Pro-Tip
When shooting your video, you must take into consideration that showing your video in a different aspect ratio medium may cause losing parts of the frame or showing parts, you didn’t want the audience to see. This is the reason that sometimes when you watch on a 4:3 TV set a film that was shot in a 1.85:1 ratio, you can see the boom mike at the upper side of the frame. If you don’t want to lose parts of the frame simply shoot within the “Safe Zone” of your camera.
Frame rate
A shot is built from frames. Frame rates, also known as FPS (Frame Per Second) is the term that indicates how many frames are shot in each second. When films first started it was 16 frames per second. Since then the frame rate has risen up a lot. Today there are 8 types of frame rates to shoot at.
Choosing the one you want to shoot at got to do a lot with the kind of look you want your film to have and how your film is going to be shown.
HD videos can go up to 60 fps, but in the SD world, the most used frame rate in America even today is 24 fps. Other parts of the world use 25 fps for television and 24fps for film.
The frame rate can determine how slow or fast a camera will shoot. This means that if you shoot in a lower frame rate the shot will be fast forward.
The frame rate is very important for video editors as they define the project in these settings.
Quick tip
When shooting make sure the frame rate isn’t changing or you will have a lot of problems in the editing room unless there it is very important for your film to do that.
Image Resolution
Each picture of the frame is built from small pixels, which are like little dots. The image resolution is usually defined by the number of Pixels in the picture and described by the number of horizontal and vertical pixels.
NTSC frames are composed defined as 720X480 which means the width is 720 and the length is 480.
PAL videos are 720X576
Full HD is 1920X1080.
The bigger the image resolution is the “heavier” the file will be.
When video editing, changing the resolution by scaling the video will hurt the picture. If you shot at 720X576, you can’t turn it into HD
Exposure
You should already know that light is the main tool the camera uses to create a picture. The light is bouncing on the photographed object and into the camera’s lens. The amount of light entering the lens will set the amount of information we’ll get, but also the mood of the shot.
This amount of light is defined by exposure. If you bring too much light into the camera’s lens, you will overexpose the shot. If there’ll be not enough light, you will underexpose it.
You can control the amount of light that enters your camera with the shutter speed and the iris (aperture) settings. Increasing the shutter will bring more light in. Usually, you will want it in the middle- not too bright and not too dark. When you choose a video camera, you need to decide between using an Auto Exposure shutter or a Manual Exposure
Some cinematographer uses a light meter to measure the intensity of the light, but if you don’t have one, the best way to set the exposure is to get as close as you can to the object, you want to shoot. Then you move back into the shot you planned while setting the exposure through the way it showed you at the close-up
So that’s about it. If you want me to write more articles like this, please let me know. As I said on the home page, I would like to focus more on the creative stuff, but some of you emailed me and asked me to talk about some digital video terminology, so I did.
Important Camera Techniques you must know
Now, it doesn’t matter what your job is in the film, you must know and understand the basic Camera Techniques and Movements. This is why I also put this article on the film direction course page. Not knowing or not paying attention to this stuff can ruin all your hard work.
What is the 180 rule?
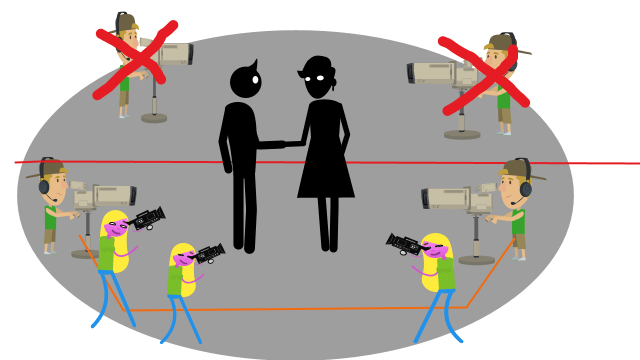
The 180-degree rule is one you will hear lots of your crew members talk about in film production. Here’s the deal:
The rule helps you not mess up the direction of characters in the film while relating to each other. For example, if you have a scene with two characters talking to each other, not following this rule, it might make them look like they are talking to themselves.
The 180-degree rule is an imaginary line connecting the two (or more) characters in the scene. The camera has to stay on the same side of the track during the whole scene. Crossing the line will mess up the direction the characters are looking at.
30-degree rule
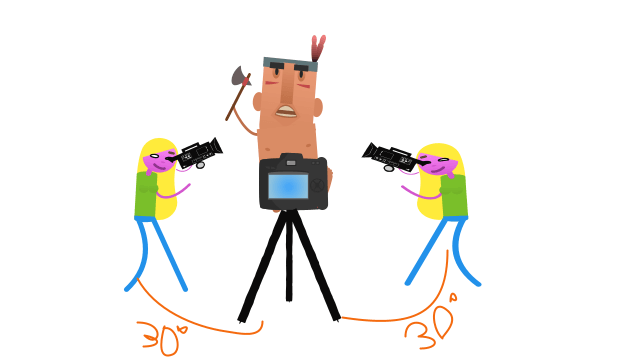
Make your video editor’s life easier by moving your camera angle at least 30 degrees between each shot of the same subject being shot. For example, if you are shooting a car and you want to shoot it from a different angle, you should make sure your next camera angle will move for at least 30 degrees from the previous shot. Otherwise, a “Jump Cut” will appear. A jump cut is when two shots don’t attach smoothly.
Use Camera movements to built emotion
Some camera movements can make the atmosphere in the film a lot stronger. The camera movement is critical to set the scene’s emotion, and it something you’ll have to practice a lot. A wrong camera movement can ruin the scene atmosphere. You have to be careful not to use them too much, as many beginner directors tend to do, as it might make the audience lose focus. Use them only when it’s necessary for the scene. Remember! A good camera work doesn’t call attention from the audience.
If you decide to go on the camera movement, I would recommend shooting the same shot in a static camera, just to be safe. Sometimes a movement shot will look great in your head, but in the editing room, it won’t feet, and then you’ll be lucky to have the static take.
As an exercise, I would advise you to shoot a scene with all the movements I’m going to introduce you now and then reshoot the same scene with static cameras and see what kind of scene you are getting each time.
Zooming In & Zooming Out
It is a process in which the cameraman changes the lens length from long (Wide Angle) to close-up. This movement tells the viewer that what is happening now is essential. Usually, we use it when the character becomes emotional or to highlight it is saying.
Point of View
The camera transmits the point of view of an object in the scene. It takes the place of looking. If we are filming two people talking and we want to pass the point of view of one over the other, the camera will be in front of the photographed object in the place of the one we want to emulate his eyes. Usually, the photographed object will not look directly into the camera, but 30 degrees to the side. If the object looks directly into the camera, it’s like he is looking directly at the audience and thus breaks the cinema’s magic. Of course, there are quite a few films that do this on purpose, but this should be a conscious decision.
Pan Left \ Right
While the camera is sitting on a tripod, we motion its lens to the left or right. It means that the camera is scanning the scene horizontally. If you nod your head left and right, you will see how pan left and pan right looks. If the director wants to see more of the right, he will ask the cameraman to Pan Right. These movements often are done relatively slowly unless doing what is called:
“Swish Pan,” which is a high-speed pan that creates a blurred background. This camera movement also excellent to immolate point of view
Tilt-Up/Down
The camera is stable on a tripod. Now, move the lens up or down, The camera is scanning the scene vertically. If you nod your head up and down, you will see how tilt up and down looks like. If the director wants to see more of below the frame, he will tell the cameraman to tilt down.
Usually, we use it to show the size and power of a person or an object in relation to the viewer, so the viewer feels as if he is looking up. The same thing when you want to emphasize the lack of power Tilt down will show the bottom part of a photographed object. This camera movement also excellent to immolate point of view
Here is a scene from one of the funniest films I know- the movie Top Secret – from the masters of parody- Jim Abrahams and David and Jerry Zucker– to show you a small Til up
read about more camera angles here
Enhance your camera movements
The movement we saw up to now is effortless, but there is a way to make them look much more powerful. The DollyDolly is kind of a cart that you put on tracks and put the camera on it, and it creates smooth motion. It makes the viewer less passive while watching and feel more active.
Dolly In/Out
A dolly shot is a type of tracking shot, also known as” Dolly Zoom.”
Dolly In means to get closer to the object – we will usually use it to emphasize a sentence in dialogue, emphasize emotions, or emphasize a moment of realization. Dolly Out means to get away from the object – we will usually use it to capture the environment around the objects or to emphasize emotional disconnection. It is quite similar to Zoom In and Out, but there is a big difference:
On a Dolly shot, the photographed object’s ratio and its environment will remain the same so that the visual effect will be a lot stronger in the “Dolly shot.” The way to do this is by pulling the camera backward or pushing it forward while pulling the zoom on the lens in the opposite direction. It will always look better then zoom in because zoom in calls for more attention from the audience, while the DollyDolly is more subtle.
Track Left/Right
Move the camera on the DollyDolly to the right or the left. This kind of movement is useful to create at the viewer a feeling of more activeness.
Make your movement look professional
Your camera movements must be smooth and substantial to the story. Otherwise, they will attract too much attention, and it will interrupt the viewer to Be “sucked” into the film’s atmosphere. The viewer might also be aware that he is watching a movie, and once that happens, you lose him. Therefore, it is essential to practice as much as possible on these camera movements. Today’s homework is to start paying attention to the camera angles and movement in the films and tv shows you are watching. Try also to take it a step forward and understand the emotion the director is trying to set with these angels.